How do we build a miniature FM transmitter?
What does the project present?
The DIY project presented is a mini FM transmitter, easy to build. Any standard receiver with FM band can be used as a receiver. The assembly is ideal for surveillance of a room, surveillance of children, having a emission radius up to 400m.
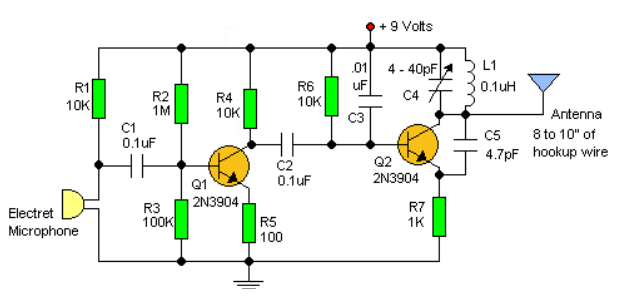
Electronic diagram of the miniature FM transmitter
Constructive details
Coil L1 has 8-10 turns, from reuses made of similar old coils, wound on an insulating core with the approximate diameter of an ordinary pencil. C4 is a 4-40pF semi-adjustable capacitor.
Adjust the receiver (radio) to a “clean” place at the bottom of the band. With a plastic screwdriver adjust C4 for clearer reception.
Experiment with patience! Most components do not have critical values, so you can change them to see the effect!
The capacitors are of ceramic type, preferably of class 1%, or equivalent. Any capacitors can be used except electrolytic or tantalum capacitors.
If you want to use this outdoor installation, it is recommended to choose capacitors that are less sensitive to temperature changes.
List of required components
R1, R4, R6 = 10 KOhm
R2 = 1 MOhm
R3 = 100 KOhm
R5 = 100 Ohm
R7 = 1K
C1, C2, C3 = 0.1 uF
C4 (semi-adjustable capacitor) = 4 – 40 pF
C5 = 4.7 pF
Q1, Q2 = 2N3904
L1 = 0.1 µH
1 x Electret Microphone
1 x Copper wire antenna = 20-25 cm
1 x 9V battery
Bibliography:
https://cidigg.blogspot.com/
Dominte Claudiu (Romanian translation)


